-
Running two Firefox profiles simultaneously
At yesterday's WebSG meetup, someone asked me how you can have 2 different user sessions in Firefox, and I was unable to answer as I never had the need for 2 different user sessions (though I imagine it'd be nice for testing certain types of interactive web applications).
Anyway, I found the answer today after some Googling - Lifehacker's "Manage multiple Firefox profiles" article.
Basically, once you have started Firefox in a profile that you want, you can start another profile by passing the '-no-remote' switch together with the name of the profile you want to start with the '-P' switch:
/path/to/firefox -P profile_name -no-remoteIt does mean you need 2 different profiles though, for the 2 different user sessions. Oh well.
-
Debugging SSH public key authentication problems
After a longer than desired struggle with getting sshd to accept my public key, I think a blog post is in order to remind myself not to repeat the same mistakes. Here's how you should go about debugging your SSH public key authentication woes:
- Getting more debug info when connecting with your ssh client: Add a '-v' option to your ssh command (e.g. ssh chuyeow@remotehost -v -v -v). Add more '-v' for more detailed debug (you can do up to '-v -v -v' I think).
- Debugging on the remote host by running sshd in debug mode: Run '/usr/sbin/sshd -d -p 2222' on the remote host and connect to it. '2222' here is the port number of the sshd process you started on the remote host.
- tail the authentication log: Run 'tail -f /var/log/auth.log' on the remotehost. You can watch the log as you try to connect via SSH with your key.
- Make sure your ssh key agent is running: Do a 'ps aux|grep ssh-agent'. Make sure your key agent is running. If you're not using ssh-agent (I like keychain from Gentoo, or SSHKeyChain for Mac OS X), do whatever you have to do to ensure that your keychain is running.
- Make sure your private key is added to the ssh key agent: Do a 'ssh-add -l' to check that ssh-agent has your key. Likewise, if you are using something else, check your keychain application has your private key.
- Check the permissions on your home directory, .ssh directory, and the authorized_keys file: If your ssh server is running with 'StrictModes on', it will refuse to use your public keys in the ~/.ssh/authorized_keys file. Your home directory should be writable only by you, ~/.ssh should be 700, and authorized_keys should be 600.
Tailing the authentication log was the clincher for me this time - my problem was the group permissions on the home folder were incorrectly set (the error message I got from auth.log was: 'Authentication refused: bad ownership or modes for directory /home/chuyeow'). Just had to fix it so it was no longer group-writable. Of course, this can also be fixed by turning setting 'StrictModes off' in your sshd config (/etc/ssh/sshd_config), but it's not really recommended. Plus, you may not always have the rights to edit that file anyway.
-
IMAP-IDLE plugin for Apple Mail
Yup I switched to Apple Mail from Thunderbird a few months back, primary reason being back then I was barely able to run my developer applications on 512MB of RAM (Apple Mail runs lighter than Thunderbird, unfortunately). It's comforting to find that there is an IMAP-IDLE plugin for Apple Mail (Thunderbird got its IDLE support way back in 2004.)
What's IDLE? Well, quoting myself:
Simply put, IDLE is a command that allows IMAP email servers to transmit updates to the client in real time. This saves the client from having to continuously poll the server to achieve the effect of new mail appearing immediately. All in all, an exceptionally useful command that saves Thunderbird the work of polling IMAP servers continuously.
So anyway, it's really simple to install and use (just simple checkboxes for enabling IDLE for your IMAP accounts).
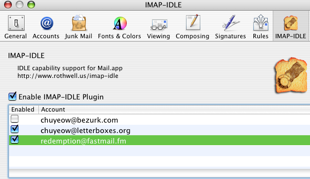
Remember to configure Mail to stop polling these mail accounts every X minutes or so now. Enjoy the geeky feeling of knowing you've just saved several CPU cycles and a few kilobytes of bandwidth.
-
Finally, Bezurk and news.com.au co-brand is up and running
It was a few weeks later than planned, but finally (actually, about 3 days ago), we're up on the News.com.au Travel section.
No thanks to a CSS bug in IE6, we were delayed by a week. The last thing we expected was a CSS bug hanging IE6 with all the JavaScript we were pushing out, but yeah, well, it was. At least now my conscience is clear - everything works nicely in IE6, IE7, Firefox, Safari and Opera.
-
Sharing a USB printer from Mac OS X to Windows
Not too long ago I was asked to use hook up the Mac Mini that was collecting dust in our office to our HP Deskjet printer (HP Deskjet 1280 to be exact) and have it function as a "print server" of sorts (we have since replaced it with a NAS with print server functionality, which subsequently broke - that's how long this post has been sitting in my drafts folder). While setting it up to be shared with Mac machines was a cinch (we have a grand total of 3 Mac machines in the office, including the Mac Mini and my treasured MacBook Pro), sharing the printer from the Mac (Mini) to Windows machines was significantly more difficult. After some trial and error, first with what made the most sense, and then with stuff I could glean off the Internet, I finally arrived at something that works. Maybe this would be useful for the next unfortunate bloke that needs to do this sharing of printers from Mac to Windows machines without a print server.
First point of reference: Print from Windows XP to a shared Mac printer tip on Mac OS X Hints. The tip suggests you select a PostScript driver in Windows after finding it on the network (which requires you to do several things first, but we will come to that later). This worked, but it was sub-optimal because you couldn't use the printer driver software to do stuff like 2-up printing (i.e. print 2 pages per side per sheet). This post will show you how to share a USB printer from Mac OS X to Windows PCs with full driver capability.
- On the Mac (the one that the USB printer that you want to share is connected to), go to the Sharing preferences pane and ensure Printer Sharing and Windows Sharing are both turned on.
- Fire up your browser and go to http://127.0.0.1:631 - this is the web interface to CUPS. When asked to enter a password, login with your Mac OS X user account (it has to be an administrator account).
- Go to the Printers tab and add a new printer (yes, in addition to any existing printer configuration that already exist for the same printer). Choose a name that's short and descriptive (no spaces). For the purposes of this guide, let's call it 'uberprinter'. Best to keep it under 12 characters since Windows is finicky.
- When asked to select a device, select USB printer.
- You'll be asked for a Device URI. To find out, open up a terminal and type
lpinfo -v. You should see your USB printer coming up. Mine came up as 'direct usb://HP/Deskjet%201280?serial=CN516851RPUN'. Copy and paste this (without the 'direct' part - i.e., I'd have copied 'usb://HP/Deskjet%201280?serial=CN516851RPUN') into the 'Device URI' field. - Select a 'Make' of 'Raw'. Keep going until the printer is added.
- You're done configuring from the Mac. But before you go, determine your Mac's IP address (do a 'ifconfig' in a shell or fire up System Profiler and check out the 'Network' item) - note it down somewhere. Now it's time to hook up your Windows machine to use the shared printer.
- OK now go to your Windows machine and add a new printer (Control Panel -> Printers and Faxes). Select 'A network printer... blah blah'. Don't browse for the printer, you will enter its IP address directly in the 'URL' field. Enter 'http://your.macs.ip.address:631/printers/uberprinter' (replacing 'your.macs.ip.address' with your Mac's IP address and 'uberprinter' with the short name you gave your printer). If you can't remember your printer's name, just scurry back to the Mac and browse to http://127.0.0.1:631/printers/. You should be able to see the printer you added listed there - its name is linked there.
- Now, all that's left is to install the correct Windows printer driver on the Windows machine. If you're lucky Windows already has your driver, if not do whatever you need to get the proper driver - after all, the purpose of jumping through all these hoops is to get full printer driver functionality off the shared Mac printer.
That's it. That'll teach you for not getting a print server or one of those new printers with network functionality.
Problems?
Some readers wrote in with their own difficulties and have kindly allowed me to share their solutions. First off, Patrick McKrell who had a solution for cases where you still are just not able to print from the Windows machine (it involves killing a daemon so it's pretty sweet).
Thank you for making available your instructions for sharing a USB printer connected to a Mac using OS X with a Windows PC. All of your points worked flawlessly on the Mac. My Mac is a B&W G3 running OS X 10.2.8. The printer is an HP PSC 1510.
...
Back to Windows Add Printer. Is my driver there? No. I browsed the Windows file system to Program Files/HP/. No luck. Couldn't find or add my driver. Next I unplugged the printer's USB cable from the Mac and into the PC. Windows detected the new hardware, created whatever files it needed, and automatically created the USB-connected PSC 1500 series printer in Printers and Faxes. Well, that's pretty darn close. I opened the printer's properties, changed the port from USB to Internet Port (as per your configuration guidance), sent a print job....and nothing. Hmmm.
Finally, I recalled seeing someone's web post --thanks to your point of reference. I followed the poster's instructions, and, yeah, it prints, and in color. Thanks again, Chu, for your post. It was easy to follow, and importantly, it worked with my setup (despite the color issue).
Patrick McKrell
The solution? Change your CUPS configuration to allow raw printing:
Basically, I saw that every job on the windows side had "error".
After looking at the error logs for cups on the mac box (/var/log/cups/), I noticed this line repeatedly:
print_job: Unsupported format 'application/octet-stream'!
Did some googling, and found a post with the answer:
>
> You probably need to uncomment the following lines in
> /etc/cups/mime.types and /etc/cups/mime.convs:
>
>
> /etc/cups/mime.types:
> #application/octet-stream
>
>
> /etc/cups/mime.convs:
> #application/octet-stream application/vnd.cups-raw 0
> -
>
>
> That will allow raw printing.Then, kill -HUP the cups daemon, and you're good to go.
subscribe via RSS